
Introduction to Mini Santa Hat Cheesecakes
The holiday season calls for delightful treats that capture the spirit of celebration, and Mini Santa Hat Cheesecakes fit the bill perfectly. These charming little desserts blend the creamy richness of eggnog-flavored cheesecake with a chocolate crust and whimsical strawberry hats, making them a festive centerpiece for any gathering.
Why Mini Cheesecakes Are the Perfect Holiday Treat
Mini cheesecakes bring a playful element to dessert tables, catering to the growing trend of portion control while still satisfying that sweet tooth. Their small size allows guests to sample a variety of flavors without overindulging. Plus, who doesn’t love a dessert that looks as good as it tastes?
These bite-sized beauties are not just easy on the eyes; they are also incredibly simple to make. With a preparation time of only 15 minutes and a cook time of just 20 minutes, you can whip them up in no time. Imagine impressing your friends and family without the stress of an elaborate dessert!
In addition, the Mini Santa Hat Cheesecakes are a fun way to get everyone involved in the holiday spirit. You could even host a cheesecake-decorating party or let guests top their treats with whipped cream and strawberries. For more inspiration on festive treats, visit Taste of Home or Food Network!
Ingredients for Mini Santa Hat Cheesecakes
Creating delightful Mini Santa Hat Cheesecakes begins with gathering your ingredients. Let’s break it down into three easy categories: crust, filling, and the festive whipped cream topping.
Crust Ingredients
- 10 Chocolate sandwich cookies: These will form a beautiful, rich crust that balances the sweetness of the cheesecake.
- 2 tablespoon unsalted butter, melted: This binds the crust together, ensuring it holds its shape.
- ½ tablespoon granulated sugar: Just a touch of sweetness to complement those chocolatey cookies.
Filling Ingredients
- 12 oz cream cheese, softened: The star of the filling that delivers that creamy texture.
- ½ C granulated sugar: To enhance the sweetness of the cheesecake.
- ½ C eggnog: This brings in that festive flavor, making it perfect for the holidays.
- 1 tablespoon all-purpose flour: Helps set the filling.
- ½ teaspoon vanilla: Adds depth and richness to the taste.
- ¼ teaspoon salt: A pinch to balance the flavors.
- 1 large egg: This is crucial for the cheesecake’s perfect texture.
Whipped Cream and Topping Ingredients
- ½ C heavy cream: Essential for that luscious whipped cream topping.
- 2 tablespoon powdered sugar: For a hint of sweetness in the whipped cream.
- 12 strawberries: These will transform into adorable Santa hats on top!
With these ingredients in hand, you’re all set to create these adorable treats. Don’t forget, you can even check out sites like Food Network or Bon Appétit for more creative holiday ideas!
Step-by-step preparation of Mini Santa Hat Cheesecakes
Creating delicious Mini Santa Hat Cheesecakes is a wonderful way to bring festive cheer to any gathering. Follow this simple step-by-step guide, and you'll have a delightful treat that’s sure to impress!
Prepping your workspace
Before diving into the delicious world of cheesecakes, it’s essential to ensure your workspace is organized. Start by gathering all your ingredients and tools. You’ll be needing a mini cheesecake pan, mixing bowls, a food processor, and an electric mixer. Preheat your oven to 350°F so it’s ready when you need it. Trust me; having everything in place makes baking not only easier but more enjoyable.
Making the chocolate crust
The first step in crafting these Mini Santa Hat Cheesecakes begins with the crust. In a food processor, blend 10 chocolate sandwich cookies into fine crumbs. Combine these with 2 tablespoons of melted unsalted butter and ½ tablespoon of granulated sugar. Each mini cheesecake cavity should be filled with a small cookie scoop of this mixture. Use the back of a spoon or your fingers to press it down firmly to form an even layer. Pop these into the oven for about 5 minutes. By the time it’s done, your kitchen will be enveloped in a delightful chocolate aroma!
Preparing the creamy filling
While your crust is baking, begin whipping up the filling. In a large bowl or using a stand mixer, combine 12 oz of softened cream cheese with ½ cup of granulated sugar. Beat them until fluffy and smooth, then gradually add ½ cup of eggnog, 1 tablespoon of all-purpose flour, ½ teaspoon of vanilla, and ¼ teaspoon of salt. Mix well, and finally, incorporate 1 large egg. Make sure there are no lumps—this is key to achieving that coveted creamy texture you'll adore.
Baking the cheesecakes to perfection
Once you’ve divided the filling into the cavity-filled crusts, lower your oven temperature to 325°F. Fill each cavity, using about 1 to 1¼ medium scoops of batter. Bake for 15-18 minutes until the centers are set. This step requires your attention—overbaking can leave you with a dry cheesecake instead of the creamy bliss we’re aiming for.
Cooling and chilling the cheesecakes
Let your freshly baked cheesecakes cool on a wire rack until they reach room temperature. Once cool, carefully transfer them to the fridge to chill overnight or for at least a few hours. This step is critical for developing that rich, smooth flavor. Believe me, the wait is more than worth it!
Whipping the cream and assembling the hats
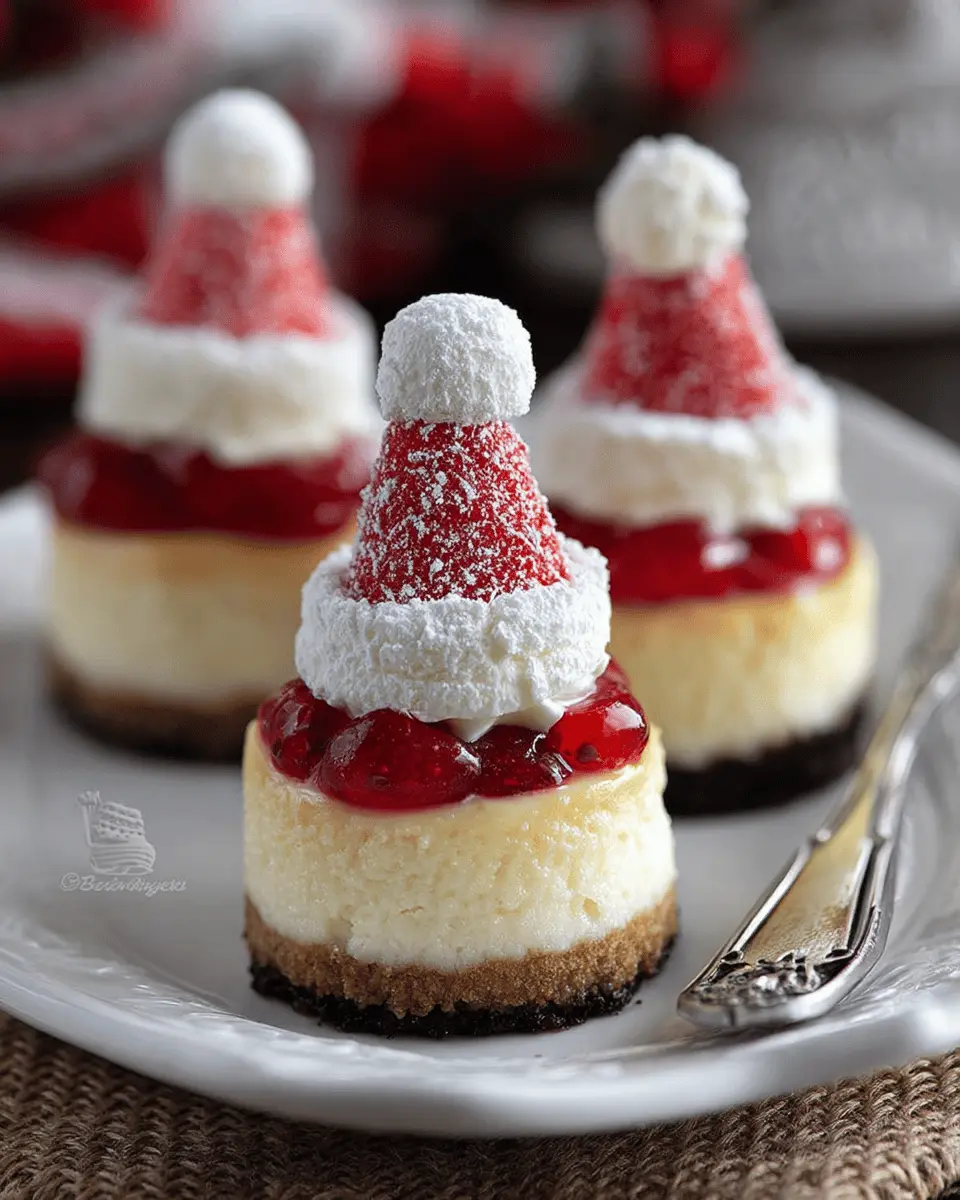
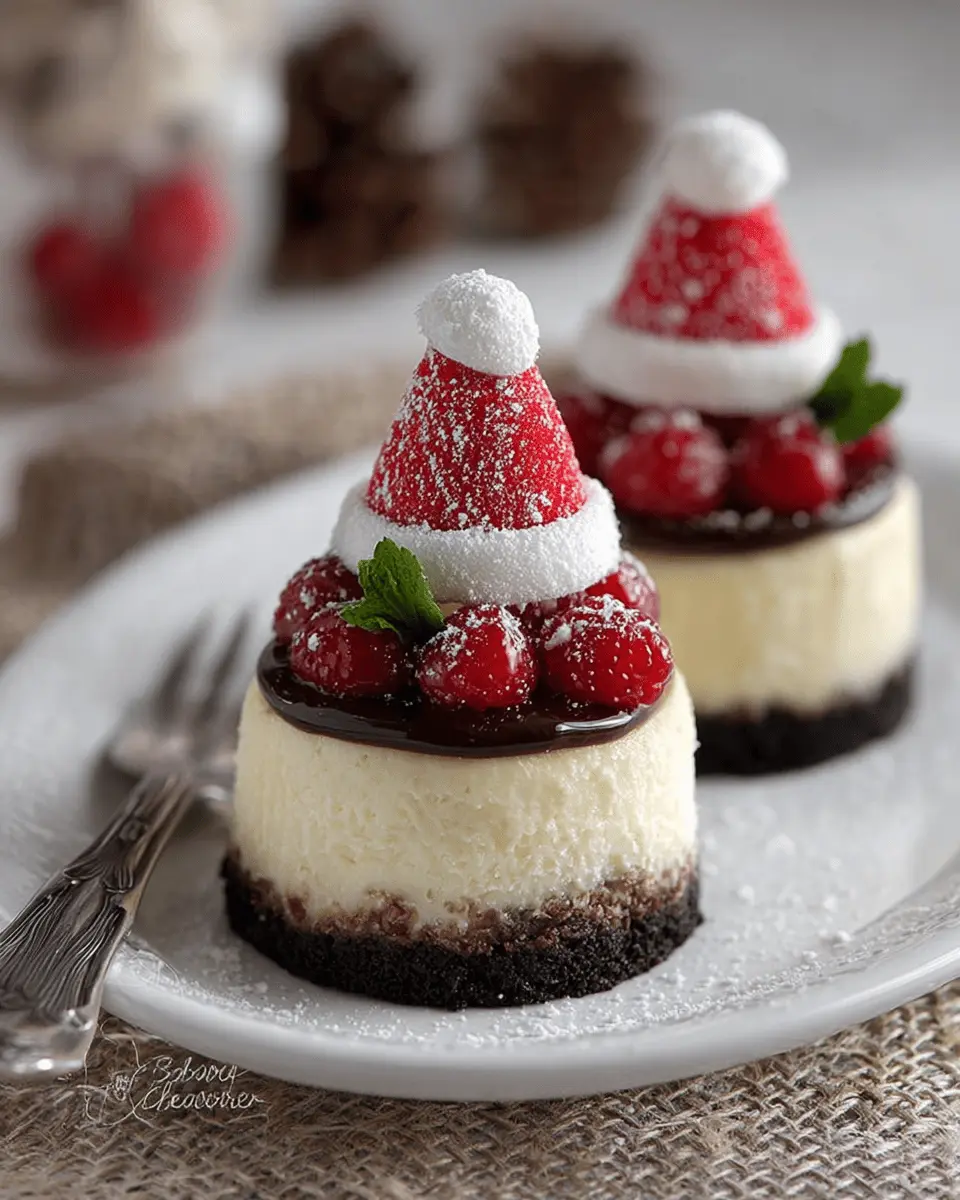
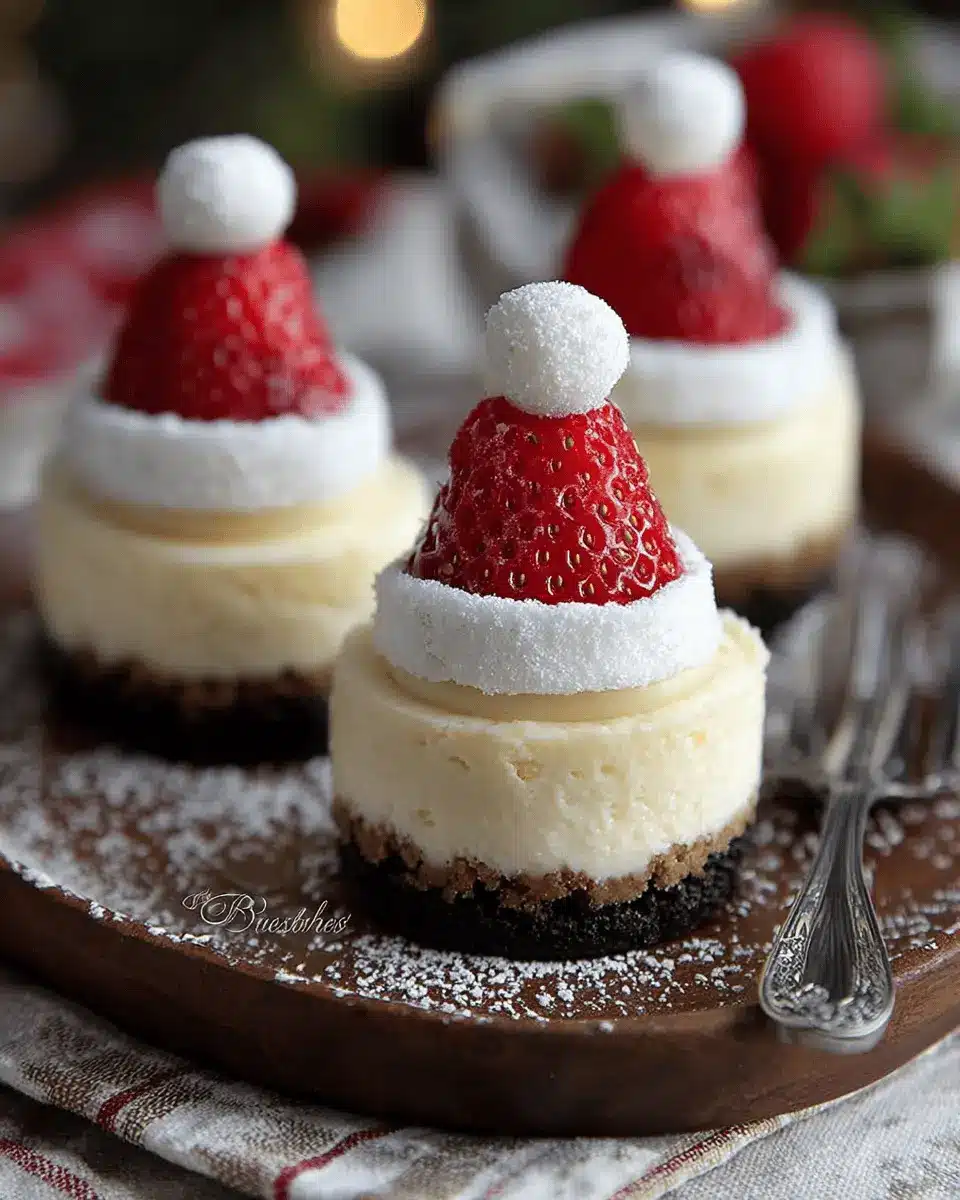
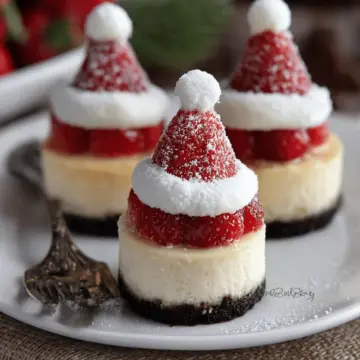
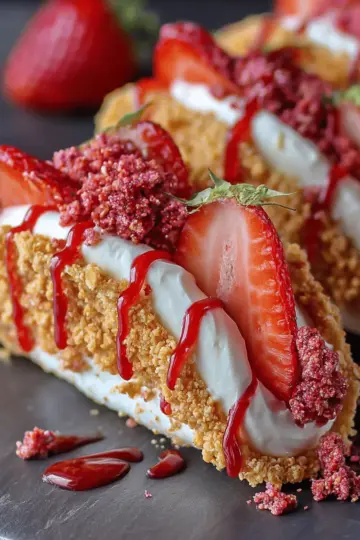
When your cheesecakes are chilled, it’s time to prepare the topping! Beat ½ cup of heavy cream with 2 tablespoons of powdered sugar until stiff peaks form. Now, you can carefully remove the cheesecakes from their pan, topping each one with a generous dollop of whipped cream and placing a strawberry on top to create your adorable Santa hats. For that finishing touch, dust with powdered sugar for a magical, snowy effect.
And voilà! You've successfully crafted Mini Santa Hat Cheesecakes, perfect for serving at holiday parties or simply enjoying at home. Happy baking!
Variations on Mini Santa Hat Cheesecakes
Eggnog-flavored twist
Elevate your Mini Santa Hat Cheesecakes by adding an eggnog twist! Simply substitute half of the cream cheese with eggnog-flavored cream cheese for a delightful, seasonal flavor enhancement. You can also incorporate a teaspoon of nutmeg to your filling for that classic holiday spice. This creamy upgrade pairs beautifully with the chocolate crust, creating a unique treat that’s sure to impress at your holiday gatherings.
Alternative toppings for festive flair
While the traditional strawberry hats are delightful, why not switch things up? Consider using:
- Raspberries for a tart bite.
- Maraschino cherries for a fun pop of color.
- Crushed peppermint candies for a minty crunch.
These alternatives can add a vibrant touch to your Mini Santa Hat Cheesecakes, making each bite a festive celebration!
Cooking Tips and Notes for Mini Santa Hat Cheesecakes
Common Baking Pitfalls to Avoid
When whipping up your Mini Santa Hat Cheesecakes, be wary of the following common pitfalls:
- Overmixing: When mixing your filling, avoid overdoing it after adding the egg. This can cause excessive air bubbles and lead to cracking while baking.
- Temperature Control: Make sure your oven is accurately preheated. An unreliable oven can spoil your cheesecakes’ texture. An oven thermometer can be a helpful investment.
For more tips on baking, consider checking out resources like King Arthur Baking or America's Test Kitchen.
Tips for a Perfect Crust and Filling
Crafting the ideal crust and filling can elevate your Mini Santa Hat Cheesecakes:
- Crust Consistency: Aim for a texture that holds together firmly. If it crumbles too easily, add a splash more melted butter.
- Chill Your Ingredients: Ensure your cream cheese is softened but not warm, as this helps in achieving a smooth filling.
- Chill Overnight: Patience is key! Allow the cheesecakes to set overnight in the fridge for the best flavor and sliceability.
Happy baking, and enjoy your festive treat!
Serving suggestions for Mini Santa Hat Cheesecakes
Perfect pairings for holiday gatherings
When it comes to enjoying your Mini Santa Hat Cheesecakes, the right accompaniments can elevate your dessert game. Consider serving them alongside a warm cup of hot cocoa or a festive spiced apple cider for a cozy contrast. For a savory bite, pair them with platter items like turkey bacon-wrapped asparagus or chicken ham sliders, which can balance the sweetness. And don’t forget the importance of vibrant seasonal fruits like pomegranate seeds or citrus slices—these can add a fresh pop of flavor to your festive spread.
Creative ways to present your cheesecakes
Presentation is everything, especially during the holidays! Arrange your Mini Santa Hat Cheesecakes on a beautiful cake stand—maybe even sprinkle some edible glitter for a sparkly touch. Alternatively, consider placing them in clear dessert cups, garnishing with extra whipped cream and a sprig of mint for a lively look. You could also add small name tags for each cheesecake, noting their delightful flavors to spark conversation among guests. If you want to go the extra mile, decorating your serving area with festive holiday décor could create a charming atmosphere that enhances the festive allure.
For more creative ideas, check out these fun holiday dessert decorating tips from Food Network.
Time Breakdown for Mini Santa Hat Cheesecakes
If you’re gearing up to make these delightful Mini Santa Hat Cheesecakes, here's a quick overview of how you can streamline your baking adventure:
Prep Time
15 minutes
Get excited as you gather your ingredients and prepare the crust—it’s all about setting a merry mood!
Cook Time
20 minutes
While the cheesecakes bake, enjoy the delicious aroma wafting through your kitchen. Perfect time for a quick holiday playlist!
Total Time
12 hours
Most of this is chilling time, ensuring your cheesecakes set perfectly. Trust us, the wait will be worth it!
Planning ahead? Chill them overnight for the best results.
For more tips on preparing the perfect desserts, check out resources like Serious Eats or Food Network for a wealth of ideas and techniques.
Nutritional Facts for Mini Santa Hat Cheesecakes
When indulging in Mini Santa Hat Cheesecakes, it's essential to know the nutritional breakdown. Each mini dessert packs a delightful flavor while considering your dietary needs.
Calories per cheesecake
Each Mini Santa Hat Cheesecake contains approximately 150 calories, making it a tasty treat without breaking the calorie bank.
Protein content
These cheesecakes offer about 3 grams of protein per serving, thanks to the cream cheese and egg, providing a bit of sustenance amidst the sweetness.
Sugar and sodium information
You can expect around 10 grams of sugar and 120 milligrams of sodium in each cheesecake. While this treat has some sugar, the balance of flavors keeps it satisfying without being overly sweet.
For more on nutrition basics, you might find this resource on nutrition.gov helpful. Happy baking!
FAQ about Mini Santa Hat Cheesecakes
Can I make these cheesecakes ahead of time?
Absolutely! Mini Santa Hat Cheesecakes can be prepared a day in advance. After baking, let them cool to room temperature and then refrigerate overnight. This not only saves you time but allows the flavors to meld beautifully. Just make sure to top them with whipped cream and strawberries right before serving to keep everything fresh.
What are some tips for making the filling extra smooth?
For the creamiest filling, ensure your cream cheese is at room temperature before mixing. This helps avoid lumps. Use a stand mixer if you have one, and mix on low to incorporate the ingredients gradually, avoiding overmixing once you add the egg. For even more creaminess, consider sifting the powdered sugar into the mixture.
Are there gluten-free alternatives for the crust?
Yes, you can easily make a gluten-free crust! Opt for gluten-free chocolate sandwich cookies instead. Just check the label to ensure they’re entirely gluten-free. Crush them the same way you would regular cookies, and you’ll have a delicious crust that everyone can enjoy. For more tips on gluten-free baking, check out this resource.
Conclusion on Mini Santa Hat Cheesecakes
Mini Santa Hat Cheesecakes are a delightful addition to your holiday festivities. With their creamy eggnog filling and festive strawberry hats, they not only taste fantastic but also look adorable on any dessert table. Don’t forget to share these treats with friends and family—they're bound to create sweet memories!
For more festive ideas, check out this article on holiday desserts at Food Network.
Mini Santa Hat Cheesecakes
Equipment
- Mini cheesecake pan
- Food processor
- Stand Mixer
- wire rack
Ingredients
Crust
- 10 cookies Chocolate sandwich cookies see note
- 2 tablespoon Unsalted butter melted
- 0.5 tablespoon Granulated sugar
Filling
- 12 oz Cream cheese softened
- 0.5 C Granulated sugar
- 0.5 C Eggnog
- 1 tablespoon All purpose flour
- 0.5 teaspoon Vanilla
- 0.25 teaspoon Salt
- 1 large Egg
Whipped Cream
- 0.5 C Heavy cream
- 2 tablespoon Powdered sugar
- 12 units Strawberries
Instructions
Preparation
- Preheat oven to 350°F. Lightly grease a mini cheesecake pan.
- In a food processor, blend cookies until only fine crumbs remain. Combine crumbs with butter and sugar. Divide between prepared cheesecake cavities, adding 1 small cookie scoop of crust mixture to each cavity. Press down firmly to create an even layer. Bake for 5 minutes.
- Reduce oven temperature to 325°F.
- In a large bowl or stand mixer beat together cream cheese and granulated sugar until fluffy and smooth. With mixer running on low, slowly add eggnog, flour, vanilla and salt. Gradually increase speed, mixing until no lumps remain. Finally, add egg, mixing until combined and no streaks remain.
- Divide batter between cheesecake pan cavities using a medium scoop. Add roughly 1 and ¼ medium scoop or a heaping scoop to each cavity. Bake for 15-18 minutes or until cheesecakes are set.
- Allow cheesecakes to sit in pan on a wire rack until they are room temperature. Transfer cheesecakes to refrigerator to chill overnight or until chilled through.
- In a medium bowl, beat together heavy cream and powdered sugar until stiff peaks form. Cover and chill until ready to use.
- Carefully remove cheesecakes from pan, removing the pan disc from the crust. Top off with whipped cream and strawberries. Sprinkle with optional powdered for a snow dusted look.


Leave a Reply